Showing posts with label CRM Latest Features. Show all posts

Monday, 8 January 2018

Unable to connect Plugin registration tool to Latest Dynamics 365 Version 9.0

Unable to connect plugin registration tool 

Recently i created a trial D365 org (version 9.0.0.3172) and tried connecting plugin registration tool downloaded with PRT of lastes sdk (version 8.2.1.1)from downloaded form here which is latest as on date on that portal of MS.

Newly created trail org is of version 9.0. while the latest sdk available is 8.2 but i though it shouldn't be any problem (though it was) since we were used to of using older version plugin registration tools with newer version of CRM ( remember connecting CRM 2013 organisation with PRT of 2011 sdk).


On some digging i found that reason of the same:

Latest Update on Dynamics CRM V9:


Latest update in the Microsoft TSL(Transport Security Layer) Protocol in SDK assemblies.

Microsoft allowed the TSL connection 1.0  and 1.1 for the browsers or client to connect the CRM org. Now Microsoft will support only TSL 1.2 or above. Can get more information here

If you are connecting your latest dynamic CRM trial org with the old version of plugin registration tool or connecting any external application, then you may face an issue.


TSL protocol of our .Net client is usually 1.0. You can check how to check tsl protocol of your .Net client by downloading fiddler from here

Once Fiddler gets installed, Go to Tools > Options in order to check Protocol version:


To Resolve Plugin registration connection issue we need to install Latest Plugin registration tool from Nuget rather than using PRT(Plugin registration tool) available in latest sdk available on MS website which is version 8.2.1.1 :-

Resolution:

There are 2 way of installing Latest Plugin registration tool easily:-
Option A:-

1. Create/Open a project in Visual studio


2.  Navigate to Tools>NuGet Package Manager>Package manager console


3. Paste following command in Packager manager console and hit enter:
Install-Package Microsoft.CrmSdk.XrmTooling.PluginRegistrationTool -Version 9.0.0.7


once executes, this will install the package in current opened solution folder.

4. Open the folder of the solution opened in Visual studio:


5. You'll see PRT V 9.0 in package folder:


6. Now try to connect to your version 9.0 CRM trial, it'll get connected. :)


Option B:-


1. Create a new project just like step 1 of Option A.

2. Right click on the project and click manage NuGet Packages:
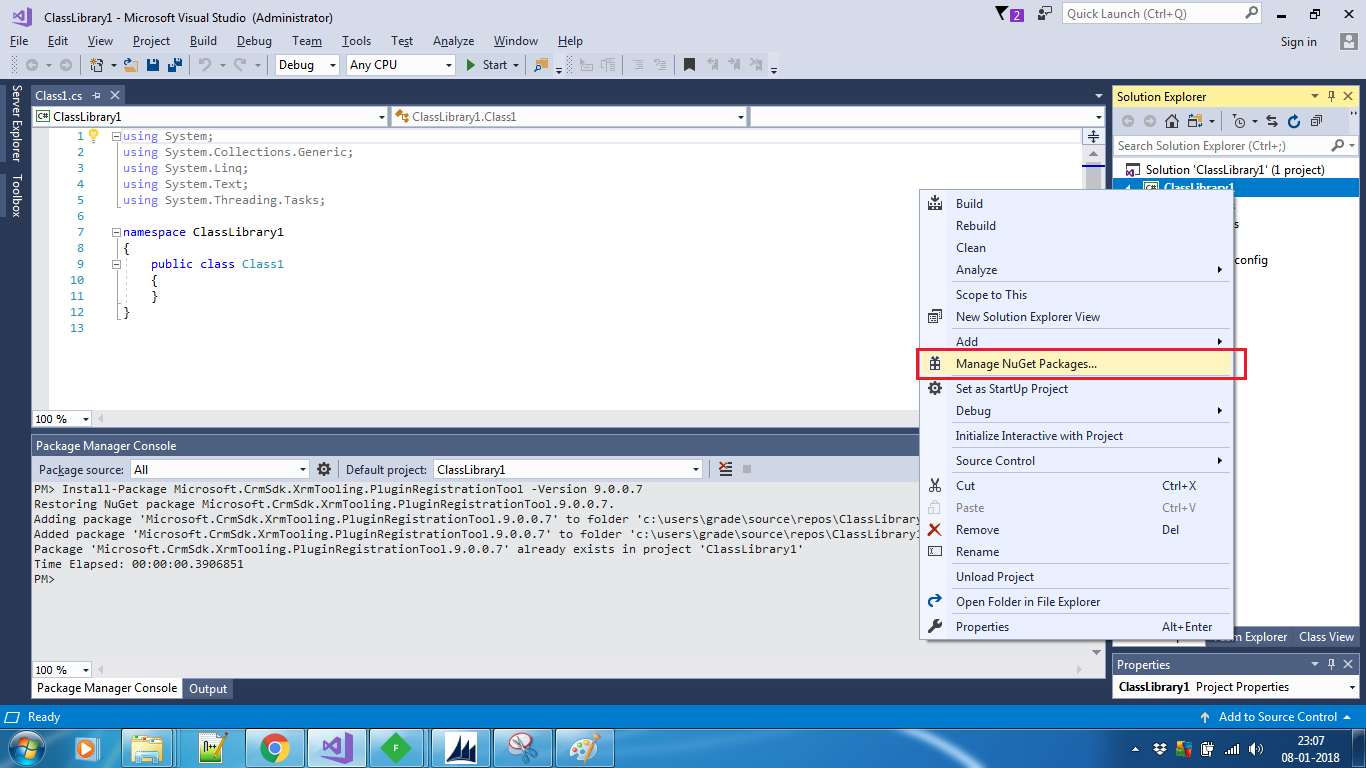

3. Click on browse and enter 'Microsoft.CrmSdk.XrmTooling.PluginRegistrationTool'  and click install:-


4. It'll install the package in your solution's folder:-


5. You can navigate to the installed package same as step 4 and 5 of option A mentioned above.

6. Now connect your PRT with version 9.0 crm org and enjoy plugin registration.

Happy CRM,

Sunday, 13 November 2016

How to enable Feedback in Dynamics crm 2016

How to manage Feedback in Dynamics crm 2016

To improve customer satisfaction, tracking customer feedback for the products and services that your organization offers is very important. You can now add feedback or ratings to records for any entity that is enabled for feedback.
For example, if the Case entity is enabled for feedback, you can capture feedback on the support experience the customer received for the case. When several customers are rating a record, the ratings can be consolidated for each record through a custom rollup field. In a sales scenario, you can enable the Product entity for feedback to capture users' feedback on the products you sell.
Here, we;ll learn how to enable feedback for an entity and how to get the collaborated rating from multiple feedbacks of a record.
Important
This feature was introduced in CRM Online 2016 Update 1 and in CRM 2016 SP1 (on-premises).
We'll take case entity in our example and learn to enable entity and capturing average feedback rating from multiple feedbacks in case itself with the help of a roll-up field in below step by step procedure:
Step 1: Navigate to setting->Customization->Customize the system as shown in image below:

Step 2: Click on entity of your choice on which you want to enable feedback. In our case it's case entity. 
In Communication and collaboration check the feedback checkbox to enable feedback for case.
Note: Once enabled for an entity it can't be disabled again.


Step 3: Now save and publish the entity.

This is how feedback is simply enabled for an entity.

Let's now see how we can insert record in feedback of a case:

Step 1: Open the related records of case by clicking as below:

Step 2: A related feedback grid appears. Click on new feedback to add new feedback for this case as shown in below image:


Step 3: Create a new feedback record and set regarding field to the above case manually to attach the feedback to this case:

This  is how you can add a feedback record for a record.

If you have observed, in the above procedure we have to manually set  the regarding field to the case and this in not much convenient to navigate to feedback first and then add a new feedback.

To overcome this you can add a subgrid of feedback over case form itself so that user can directly add feedback from case record itself and there  isn't any need of setting regarding field separately as system itself create feedback record related to case:

Below is the step by step procedure of adding a subgrid on a form:

  1. Go to Settings > Customizations.
  2. Choose Customize the System.
  3. Under Components, expand Entities, and then expand the entity you've enabled for feedback.
  4. Click Forms.
  5. Open the form of type Main or Main - Interactive experience.
    The Main - Interactive experience form is used in the interactive service hub.
  6. Select the section you want to insert the subgrid in, and on the Insert tab, in the Control group, click Sub-Grid.
  7. In the Set Properties dialog box, fill in the name and label for the subgrid.
  8. In the Data Source section, select the information:
    • Records. Select Only Related Records.
    • Entity. Select Feedback (Regarding).
    • Default View. Select a default view for the list.
9. Click save and publish to make change effective.


You might want to get the average collaborated rating given by customers for a given case through feedback records on case record.
This can be easily done with the help of roll-up field.
Below is the step by step procedure to create a rollup field to calculate the average rating for a case:

Step 1:  Add a new field on case entity as shown in image below.
Datatype of field should be whole number and make it of type rollup and click edit to set an aggregation formula:

Step 2:  Set the properties as shown below:

Step 3: Save the field and place the field on the place of your choice in case form and publish the case form.

Step 4:  Let's say there are 3 feedback records for a case with ratings 3.4 and 5 as shown in below image:


Step 5:
Calculating average rating: 

This was how you can enable and configure feedback in your system for any entity.

Hope this post was helpful.

Keep following for more updates...!!

Wednesday, 1 June 2016

How to read Resource Calendar in MS CRM using C#

How to read Resource (System User/ Facility-Equipment ) Calendar in MS CRM using C#

How to check Resource availability in MS CRM using C#


Many times one needs to schedule some tasks/functionalities according to the resource work hours in calendar. 

For Ex: Send some Notification Emails to Resources only in working hours or assigning some activities to resource (User/Facility-Equipment) with-in working hours .In such case we needs to read user's calendar to get the user availability at that time.

Below is the code snippet to get the CRM Resource availability in calendar at current time.


Function Parameters   : System User/ Facility-Equipment Entity
Return Type                 :  Boolean (True if available at current time otherwise false)

///////////////////////////////////////////////////////////////////////////////////////////////////////////////////////////////////
    public static Boolean IsUser_ResourceAvailable(Entity User_Resource)
        {
            Guid currentUserId =null;
            if (User_Resource.LogicalName == "equipment")
            currentUserId = User_Resource.GetAttributeValue<Guid>("equipmentid");  
            else if (User_Resource.LogicalName == "systemuser")
            currentUserId = user.GetAttributeValue<Guid>("systemuserid");  

            QueryScheduleRequest scheduleRequest = new QueryScheduleRequest();
            scheduleRequest.ResourceId = currentUserId;
            scheduleRequest.Start = Convert.ToDateTime(DateTime.Now);
            scheduleRequest.End = Convert.ToDateTime(DateTime.Now);
            scheduleRequest.TimeCodes = new TimeCode[] { TimeCode.Available };
            QueryScheduleResponse scheduleResponse = (QueryScheduleResponse)service.Execute(scheduleRequest);
            if (scheduleResponse.TimeInfos.Length > 0)  // AVAILABLE RESOURCE
            {
                return true; //Return true if available
            }
            return false;
        }
///////////////////////////////////////////////////////////////////////////////////////////////////////////////////////////////////
You can modify the code according to the requirement if you wants to check the availability of Resource at some future time in Calendar.

Hope this would be helpful.

Comments are highly appreciated.

Happy CRMing,,,!

Tuesday, 31 May 2016

How to customise the SLA in MS CRM

How to customise the SLA in MS CRM

How to Read Orgnisation Business Closure


Today we are going to learn how to customise your SLA.


Although MS has provided  Enhanced SLA which can full-fill most of the business requirements but when requirements are so complicate that can't be handled using system Enhanced SLA, developing a custom SLA functionality is the only solution.


In this post we'll not discuss anything regarding CRM System SLA because there are many posts out there on the internet for the same and if you are here reading this post, means you want your SLA to work beyond CRM System SLA.

Here i have created a hypothetical scenario on the basis of which your customer might want the SLA to run.


1.

a) As a training scenario, i have considered that for  your customer wants different SLA hours    for cases assigned to different teams which are working in different shifts (here we'll cal,l it SLA window). 


b) Lets suppose there are 20 different teams in an organisation for which different SLA needs to be set up, then such custom SLA solution are suitable.

b) We will take  care of Organisation Business Closure as well in calculating SLA.


2.  I have created a Custom entity named SLA Configurator in my organisation with following fields:

Field Name Data Type Validation  Purpose
Name Text NA A name for SLA record
SLA window Start whole number Range 0-24 Defines SLA start time
 or shift Start time
SLA window End whole number Range 0-24 Defines SLA end time
or shift end time
Team Lookup NA Team for which this SLA
 needs to be implemented
Resolution SLA in hrs whole number Range as required Total No of SLA hrs
for this scenario
Refer to image below:


3. 
a) Now what we need to do is that on creation  of case, needs to get the team for which the case has been created, and fetch the proper SLA configuration records according to the team.

b) We'll write this whole logic in a plugin which will fire on create of Case. I assume that you will be able to do that.

c) Below is the function to which we'll pass SLA Configuration Record and organisation service object as parameters. It'll return you the date to which your Resolve by needs to be set.


Calculation are as follows:
  • A Case is created for Team1
  • SLA Configuration Master have following data for Team1 


Let's say case created on 31 May,2016 01:00PM
Case assigned to Team1 
SLA hrs for Team1 : 24
SLA start window: 10 AM
SLA End Window: 07 PM
Business Closure have holiday on 1st June,2016
Then Resolve by:

31st May,2016         :    06 hrs     (1 PM- 7 PM)
1st June                     :    Holiday in Business Closure
2nd June                   :    09 hrs      (10 AM-07 PM)
3rd June                    :   09 hrs      (10 AM-07 PM)
Total Working hrs :    24 hrs

Resolve By                :   03 June,2016 07:00PM


Below is the code snippet:

 
///////////////////////////////////////////////////////////////////////////////////////////////////////////////////////////////////////////


 public static DateTime CalculateSla(Entity SLAConfigurator, IOrganizationService service)
        {

            int workstarttime = 0;
            int workendtime = 24;
            if (SLAConfigurator.Contains("new_slastartwindow") && SLAConfigurator.Contains("new_slaendwindow"))
            {
                int start = SLAConfigurator.GetAttributeValue<int>("new_slastartwindow");
                int end = SLAConfigurator.GetAttributeValue<int>("new_slaendwindow");
                if (end > start)
                {
                    workstarttime = start;
                    workendtime = end;
                }
            
            }

            int SLAInMin = 600;  //Default Value
            if(SLAConfigurator.Contains("new_resolvesla"))
            SLAInMin = SLAConfigurator.GetAttributeValue<int>("new_resolvesla") * 60;

            DateTime tempdate = DateTime.UtcNow.ToLocalTime();
            
            while (SLAInMin > 0)
            {
                if (tempdate.Hour >= workstarttime && tempdate.Hour < workendtime && lookinbusinessclosure(tempdate, service))
                {
                    tempdate = tempdate.AddMinutes(1);
                    SLAInMin--;
                }
                else
                {
                    while (!(tempdate.Hour >= workstarttime && tempdate.Hour < workendtime && lookinbusinessclosure(tempdate, service)))
                    {
                        tempdate = tempdate.AddMinutes(1);
                    }
                }
            }
            
            return tempdate;

        }
#region businessclosure
        private static IEnumerable<Entity> GetBusinessClosureCalendarRules(IOrganizationService service)
        {
            // Get Organization Business Closure Calendar Id
            Guid orgId = ((WhoAmIResponse)service.Execute(new WhoAmIRequest())).OrganizationId;
            var organization = service.Retrieve("organization", orgId, new ColumnSet("businessclosurecalendarid"));

            var query = new QueryExpression("calendar")
            {
                ColumnSet = new ColumnSet(true),
                Criteria = new FilterExpression()
            };

            // Add condition to get Get Calander where CalanderId is equal to Organization's businessclosurecalendarid
            query.Criteria.AddCondition(new ConditionExpression("calendarid", ConditionOperator.Equal, organization["businessclosurecalendarid"].ToString()));

            // Get Calendar
            var businessClosureCalendar = service.RetrieveMultiple(query).Entities[0];

            // Return the Calendar rules
            return businessClosureCalendar != null ? businessClosureCalendar.GetAttributeValue<EntityCollection>("calendarrules").Entities : null;
        }
        public static bool lookinbusinessclosure(DateTime tempdate, IOrganizationService service)
        {
IEnumerable<Entity> businessClosures = null; //Define it static globally 
            if (businessClosures == null)
            { businessClosures = GetBusinessClosureCalendarRules(service); }
            foreach (var closure in businessClosures)
            {
                var startDate = (DateTime)closure["effectiveintervalstart"];
                var endDate = (DateTime)closure["effectiveintervalend"];
                if (tempdate >= startDate && tempdate <= endDate)
                    return false;
            }
            return true;  //true if not a holdiday
        }
        #endregion
///////////////////////////////////////////////////////////////////////////////////////////////////////////////////////////////////////////


4. Here we have taken care of Business closure as well. So this is how you can set up your custom SLA. 

Your requirements might be different and based on that you can customise it as you want.

Comments are highly appreciated..!!!

Happy CRMing 


Thursday, 19 May 2016

Things to know about New Form Rendering Engine used by MS in CRM 2015 Update 1 and further

Things to know about New Form Rendering Engine used by MS in CRM 2015 Update 1 and furtherand impact of it on page load and custom javascripts and how to prevent issues in unsupported customization using custom code validation tool :


Microsoft Dynamics CRM Online 2015 Update 1 includes a number of terrific technical improvements including faster page loads, improved application performance, and faster email delivery. One noticeable feature is the new Form Rendering Engine. This enhancement loads CRM pages faster so you can view data on the forms quickly.
Users and administrators should be aware of the impact the new engine may have on their customizations and may need to consider enabling the “Legacy Form Rendering” setting if they encounter script errors due to the new form rendering engine. In today’s blog we will focus on the specifics of the new Form Rendering Engine and give you some tips and tricks for working with it! Let’s get started!
Here are a few of the benefits of the new Form Rendering Engine:
  • No action is needed by users or administrator as this is turned on by default.
  • The loading process for record forms is significantly better and faster since more content is cached. For more information on performance, see Microsoft’s note on form rendering engine.
  • Common and custom scripts are handled separately.
  • The engine has the same functionality as it is based on previous generations. It uses Form XML Schema and has full support for client scripting.
The tricky thing for users and administrators has to do with unsupported customization or direct DOM manipulations which will possibly fail and need to be re-engineered. The following are examples of when this might occur:
  • Access window.parent from a web source that has to do with a variable set.
  • Unsupported APIs, i.e., non-XRM.
  • Window.load or iframe/form.
  • Access DOM in content iframe using JQuery or JavaScript.
In order to help catch unsupported customization, MS has added a dialog that displays the issue when script errors occur so that they do not fail silently. If these symptoms occur then it is likely there are unsupported customization in the system.
We recommend formally testing any scripts, solutions, and customization in a sandbox to ensure proper functionality AS SOON AS POSSIBLE. To assist with testing and in order to prevent errors from going unnoticed, Microsoft has added a dialog box that will display the following error message should a script error occur:

The following two options are recommended when identifying potential issues:

  • For those pesky issues that are difficult to pinpoint or that need a post-upgrade fallback plan, consider Legacy Form Rendering.
Under Settings -> System Settings -> General tab, select Yes for “Use legacy form rendering” as shown in the images below.
Note: this is a temporary measure, as this functionality is expected to be removed by Microsoft in the next CRM release. All the more reason to update any broken script immediately to avoid problems in the future.