Showing posts with label CRM Features. Show all posts

Sunday, 7 January 2018

Dynamics CRM How to view records shared with a user

Dynamics crm How to see records shared with current user

In Dynamics crm you can create different types of views but by oob views it's not possible to show the records shared with current user in any view.

For achieving we need to update the xml of a system view to make it show shared records.

Scenario: Let's say we have a view of lead named "my shared leads".

Following is the fetch xml of the view which can be downloaded from advanced find.

/////////////////////////////////////////////////////////////////////////////////////////////////////////////////////////////////////////////////
<fetch version="1.0" output-format="xml-platform" mapping="logical" distinct="false">
  <entity name="lead">
    <attribute name="fullname" />
    <attribute name="companyname" />
    <attribute name="telephone1" />
    <attribute name="leadid" />
    <order attribute="fullname" descending="false" />
  </entity>
</fetch>
/////////////////////////////////////////////////////////////////////////////////////////////////////////////////////////////////////////////////

Now to make it show shred records we have to update it's fetch xml with following xml:
/////////////////////////////////////////////////////////////////////////////////////////////////////////////////////////////////////////////////
<link-entity name='principalobjectaccess' to='leadid' from='objectid' link-type='inner' alias='share'>
 <filter type='and'>
 <condition attribute='principalid' operator='eq-userid' />
 </filter>
</link-entity>
/////////////////////////////////////////////////////////////////////////////////////////////////////////////////////////////////////////////////

principalobjectaccess table store shared records.
to: primary field of the entity for which the view is (leadid in our case)
condition: principalid
Operator: eq-userid means princinpal user should be equal to current user.

Updated XML will look like

/////////////////////////////////////////////////////////////////////////////////////////////////////////////////////////////////////////////////
<fetch version="1.0" output-format="xml-platform" mapping="logical" distinct="false">
  <entity name="lead">
    <attribute name="fullname" />
    <attribute name="companyname" />
    <attribute name="telephone1" />
    <attribute name="leadid" />
    <order attribute="fullname" descending="false" />
<link-entity name='principalobjectaccess' to='leadid' from='objectid' link-type='inner' alias='share'>
 <filter type='and'>
 <condition attribute='principalid' operator='eq-userid' />
 </filter>
</link-entity>
  </entity>
</fetch>
/////////////////////////////////////////////////////////////////////////////////////////////////////////////////////////////////////////////////

Now get the guid of view from database or by querying as follows

/////////////////////////////////////////////////////////////////////////////////////////////////////////////////////////////////////////////////
   public Guid  GetSavedQueryId(IOrganizationService service,String viewname)
        {
            Guid result = Guid.Empty;
            QueryExpression q = new QueryExpression("savedquery");
            q.Criteria.AddCondition("name", ConditionOperator.Equal, viewname);
            EntityCollection en = service.RetrieveMultiple(q);
            if (en.Entities.Count > 0)
                result= en.Entities[0].Id;

            return result;
            
        }
/////////////////////////////////////////////////////////////////////////////////////////////////////////////////////////////////////////////////

Once you got the Guid of the view you can update it with the help of following code:
/////////////////////////////////////////////////////////////////////////////////////////////////////////////////////////////////////////////////
public void UpdateSavedQuery(IOrganizationService service,Guid viewid)
 {
 Entity UpdateQuery = new Entity("savedquery");
 UpdateQuery.Id = viewid;  //new Guid("12bc926f-26c0-e111-a4f9-00155d1c5b01"); //Guid of the view to be updated
 UpdateQuery["fetchxml"] = @" <fetch version='1.0' output-format='xml-platform' mapping='logical' distinct='false'>
  <entity name='lead'>
<attribute name='fullname' />
<attribute name='companyname' />
<attribute name='telephone1' />
<attribute name='leadid' />
<order attribute='fullname' descending='false' />
<link-entity name='principalobjectaccess' to='leadid' from='objectid' link-type='inner' alias='share'>
<filter type='and'>
<condition attribute='principalid' operator='eq-userid' />
</filter>
</link-entity>
  </entity>
</fetch>";

service.Update(UpdateQuery);
 }
/////////////////////////////////////////////////////////////////////////////////////////////////////////////////////////////////////////////////
Don't forget to replace " in fetch xml with ' .

Once you execute above code, you'll be able to see shared record in your view.

Happy CRM


Sunday, 27 August 2017

How to send data in excel along with an email in CRM using C#

How to send data in excel along with an email in CRM using C#

In the previous post i discussed how can we convert a datatable into a csv file using c#.

Often in Dynamics crm we face the requirement that customer wants some data in excel attached along with the email on some regular interval or so. To do so, the first option looks like we paste the result into email body and send it as email to customer. But that doesn't looks good as user can't do much with email body what he can do if he receive that data in an excel sheet. What if we can send him data into excel attached with the email?? But the question arise, do we need to have office on the server running code?? The latest answer is: NO. Because you can create a csv file in c# and attach it along with a crm email and send it to concerned person.

For ex: Customer wants that he should get an email daily of having the number of cases created on the same day as per their origin.

Like:
Originated from    Count
Phone call             200
Email                    120
Chat                       80
Web                       400

So to send such kind of data into excel what we can do is, we can extract the data into a datatable using some C# code from their crm application and convert the datatable into CSV as explained in previous post.   Once you get the comma separated value as result from datatable, you can then create an email record into crm and pass the guid of email record along with csv result.

Below function will attach the csv string in the form of a csv with that email which can be opened easily in excel.

/////////////////////////////////////////////////////////////////////////////////////////////////////////////////////////////////////////////////////////////////////////////////////
   //Function to  add csv message as attachment with the email record of passed guid
        public static void addAttachmenttoEmail(Guid emailguid, String message, IOrganizationService service)
        {
            Entity attachment = new Entity("activitymimeattachment");
            attachment["subject"] = "SampleCSV";
            string fileName = "Sample.csv";
            attachment["filename"] = fileName;
            byte[] fileStream = Encoding.ASCII.GetBytes(message);

            attachment["body"] = Convert.ToBase64String(fileStream);
            attachment["mimetype"] = "text/plain";
            attachment["attachmentnumber"] = 1;
            attachment["objectid"] = new EntityReference("email", emailguid);
            attachment["objecttypecode"] = "email";
            service.Create(attachment);
        }


/////////////////////////////////////////////////////////////////////////////////////////////////////////////////////////////////////////////////////////////////////////////////////

Don't forget the send that email with which we just attached the csv string.

Happy Learning...!!

Sunday, 11 December 2016

How to get case resolution information on case record when the case resolved in MS CRM

How to capture case resolution information on case record when the case resolved in MS CRM


Few days ago, a requirement came to me in which we have to store the resolution data filled in resolution dialog  while resolving the case.

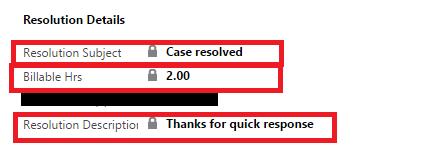
When user click resolve button on a case, a dialog box appears as shown below in which user fills the resolution details:


This information is not stored over case entity but is stored in incident resolution entity which is a backend entity in CRM and is not available to directly interact through CRM screen.

Each time a case is resolved, a record in incient resolution entity is created having refrene to the case resolved.
(It is possible to have more than 1 reord for same case is incident resolution if case is resolved and reopened multiple time.)

At first i thought of writing some server side code on resolve of case, but the problem was that after case us resolved the case record get deactivated. That means we can't update the  record by any means, be it CRM screen or service udpate request.

So writing a server-side logic on resolution of case was out of scope.

After some digging, i found out that if we run a server-side logic on creation of record of incident resolution entity, the solution would work and it will update the case before it get freezed.

I write a plugin to get the details filled by user in resolution dialog box from the incident resolution record created.

I then updated this information on 3 custom fields on case form. The output of the solution on case form is as shown below image:


Below is the code snippet of the logic::

Plugin Step Details:
Message                :    Create
Primary Entity      :    IncidentResolution
Registered on        :    Post event

////////////////////////////////////////////////////////////////////////////////////////////////////////////////////////////////////////////////////////////////////////////////////////////////////////
public class TrackTimeonCase : IPlugin
    {
        public void Execute(IServiceProvider serviceProvider)
        {
            #region Setup
            IPluginExecutionContext context = (IPluginExecutionContext)serviceProvider.GetService(typeof(IPluginExecutionContext));
            IOrganizationService service = ((IOrganizationServiceFactory)serviceProvider.GetService(typeof(IOrganizationServiceFactory))).CreateOrganizationService(new Guid?(context.UserId));
            ITracingService tracing = (ITracingService)serviceProvider.GetService(typeof(ITracingService));
            #endregion
            tracing.Trace("0.0");
            Entity targetCase = new Entity("incident");
            if ((context.InputParameters.Contains("Target")) && (context.InputParameters["Target"] is Entity) & context.Depth < 3)
            {
                    Entity entity = (Entity)context.InputParameters["Target"];
                    if (entity.LogicalName != "incidentresolution")
                        return;
                    try
                    {
                        if (entity.Contains("incidentid"))
                        {
                                targetCase.Id = ((EntityReference)entity["incidentid"]).Id;
                                Entity ResolveCase = service.Retrieve("incident", targetCase.Id, new ColumnSet("new_billablemintotal"));
                                int timespent = entity.Contains("timespent") ? entity.GetAttributeValue<int>("timespent") : 0;
                                targetCase["new_resolutiondescription"] = entity.Contains("description") ? (entity["description"] != null ? entity["description"].ToString() : string.Empty) : string.Empty;
                                targetCase["new_resolutionsubject"] = entity.Contains("subject") ? entity["subject"].ToString() : string.Empty;
                                if (ResolveCase.Contains("new_billablemintotal"))
                                {
                                  timespent = timespent + ResolveCase.GetAttributeValue<int>("new_billablemintotal");
                                }

                                    targetCase["new_billablemintotal"] = timespent;
                                    targetCase["new_billablehrs"] = ((decimal)timespent / 60);
                                    service.Update(targetCase);
                           
                        }
                    }
                    catch (Exception ex)
                    {
                        throw new InvalidPluginExecutionException(ex.Message);
                    }
                }

            }
        }

////////////////////////////////////////////////////////////////////////////////////////////////////////////////////////////////////////////////////////////////////////////////////////////////////////

Hope this was helpful...!!!

Sunday, 13 November 2016

How to enable Feedback in Dynamics crm 2016

How to manage Feedback in Dynamics crm 2016

To improve customer satisfaction, tracking customer feedback for the products and services that your organization offers is very important. You can now add feedback or ratings to records for any entity that is enabled for feedback.
For example, if the Case entity is enabled for feedback, you can capture feedback on the support experience the customer received for the case. When several customers are rating a record, the ratings can be consolidated for each record through a custom rollup field. In a sales scenario, you can enable the Product entity for feedback to capture users' feedback on the products you sell.
Here, we;ll learn how to enable feedback for an entity and how to get the collaborated rating from multiple feedbacks of a record.
Important
This feature was introduced in CRM Online 2016 Update 1 and in CRM 2016 SP1 (on-premises).
We'll take case entity in our example and learn to enable entity and capturing average feedback rating from multiple feedbacks in case itself with the help of a roll-up field in below step by step procedure:
Step 1: Navigate to setting->Customization->Customize the system as shown in image below:

Step 2: Click on entity of your choice on which you want to enable feedback. In our case it's case entity. 
In Communication and collaboration check the feedback checkbox to enable feedback for case.
Note: Once enabled for an entity it can't be disabled again.


Step 3: Now save and publish the entity.

This is how feedback is simply enabled for an entity.

Let's now see how we can insert record in feedback of a case:

Step 1: Open the related records of case by clicking as below:

Step 2: A related feedback grid appears. Click on new feedback to add new feedback for this case as shown in below image:


Step 3: Create a new feedback record and set regarding field to the above case manually to attach the feedback to this case:

This  is how you can add a feedback record for a record.

If you have observed, in the above procedure we have to manually set  the regarding field to the case and this in not much convenient to navigate to feedback first and then add a new feedback.

To overcome this you can add a subgrid of feedback over case form itself so that user can directly add feedback from case record itself and there  isn't any need of setting regarding field separately as system itself create feedback record related to case:

Below is the step by step procedure of adding a subgrid on a form:

  1. Go to Settings > Customizations.
  2. Choose Customize the System.
  3. Under Components, expand Entities, and then expand the entity you've enabled for feedback.
  4. Click Forms.
  5. Open the form of type Main or Main - Interactive experience.
    The Main - Interactive experience form is used in the interactive service hub.
  6. Select the section you want to insert the subgrid in, and on the Insert tab, in the Control group, click Sub-Grid.
  7. In the Set Properties dialog box, fill in the name and label for the subgrid.
  8. In the Data Source section, select the information:
    • Records. Select Only Related Records.
    • Entity. Select Feedback (Regarding).
    • Default View. Select a default view for the list.
9. Click save and publish to make change effective.


You might want to get the average collaborated rating given by customers for a given case through feedback records on case record.
This can be easily done with the help of roll-up field.
Below is the step by step procedure to create a rollup field to calculate the average rating for a case:

Step 1:  Add a new field on case entity as shown in image below.
Datatype of field should be whole number and make it of type rollup and click edit to set an aggregation formula:

Step 2:  Set the properties as shown below:

Step 3: Save the field and place the field on the place of your choice in case form and publish the case form.

Step 4:  Let's say there are 3 feedback records for a case with ratings 3.4 and 5 as shown in below image:


Step 5:
Calculating average rating: 

This was how you can enable and configure feedback in your system for any entity.

Hope this post was helpful.

Keep following for more updates...!!

Sunday, 5 June 2016

How to set up SLA in Microsoft Dynamics CRM (Step by Step)

How to set up SLA in Microsoft Dynamics CRM (Step by Step) :

In this post we'll learn how to set up Enhanced SLA in our Microsoft Dynamics CRM instance.
In the process, we'll learn how do Enhanced SLA works, what are SLA KPIs and how do we set up SLA KPIs, how to set up success and failure criteria of SLA and how to make system to perform some predefined actions on success/failure of SLA. I'm expecting you to know what is SLA and why it is used in MS Dynamics CRM. We'll not discuss Simple SLA and this post will be limited to Enhanced SLA.


Standard vs. enhanced SLAs: What’s the difference?

Microsoft Dynamics CRM lets you create two types of SLAs: Standard and Enhanced. Standard SLAs can only be created for the Case entity. We recommend that you use enhanced SLAs, which have some additional capabilities that standard SLAs don’t have. With an enhanced SLA, you can:
  • Create SLAs for entities other than Case.
  • Pause an SLA when the case is on hold, so that when case is on hold,that duration  isn’t considered in SLA calculations.
  • Add success actions to an SLA. For example, you may want to send communications internally or outside your organization when the SLA has succeeded. Success actions are initiated only when the success condition is met on time, not when it is breached.
  • Track SLA statuses and times right on the case form by default. These details are tracked through the SLA KPI Instance record type.

Entities (record types) that support SLA
In previous releases, you could create SLAs only for case records. With CRM Online 2016 Update 1 and CRM 2016 SP1, you can now create enhanced SLAs for entities that are enabled for SLA. A system administrator or customizer can enable SLAs for the following entities:
  • Account
  • Contact
  • Order
  • Invoice
  • Quote
  • Opportunity
  • Lead
  • All activity entities like email, phone, and appointment except recurring appointment and its instances


Note
SLA can also be enabled for custom entities and custom activities.

A bit about Enhanced SLA:

Enhanced SLAs were introduced with the CRM 2015 release and removed some of the manual processes of the standard and introduced a number of new enhanced features.


SLA Pause Resume:
    • SLA Time calculation is automatically paused when a case is put on Hold.
    • The amount of time on hold is also tracked
    • The ability to pause can be disabled/enabled for each SLA


Part A) Below is the Step by Step procedure to set up SLA :

Step 1: Navigate to Setting->Service Management:


Step 2: Click Service Level Agreement (1) in Service Terms section


Step 3: All service level agreements view will open. Click new to create a new SLA.


Step 4: Create a new SLA record with proper details as shown in image below.


  • Applicable From: Created on
  • In Business hour : Select a Customer service scheduled (Here i have already created one, will explain how to create one in part B of this post)
  • SLA Type : Enhanced
  • Allow Pause and Resume : Allow
  • Save the SLA record


Step 5: In SLA details section below, add an SLA item by clicking on + sign as show in image below:


Step 6:  A new SLA item window will open. Fill the details as follows:

  1. Fill the name.
  2. Select the type of KPI (Response by/Resolve by)
  3. In applicable when we set the criteria when this SLA should be enabled on any case.
  4. In success criteria, we'll define when the SLA will be succeeded.


Step 7: Here i have selected parameters as below:

  1. Applicable when : Case origin is phone call i.e. this SLA should be applicable on the cases created from phone call.
  2. Success Criteria: Case status is Resolved or canceled i.e. SLA will succeeded when Case will be resolved or canceled.


Step 8: Item displayed below means follows:

  1. Success Action: What should be done when SLA succeeded
  2. SLA Item Failure:After how much time of case creation SLA should fail if it is not succeeded. Here we have selected 2 days i.e. 48 working hours. (You'll understand later in the post why i highlighted working hours)
  3. Failure Actions: What should be done when SLA fails i.e. if SLA didn't succeeded in duration defined, what action must follow.
  4. SLA Item Item Warning :After how much time of case creation system should warn if it is not succeeded. Here we have selected 1 day i.e. 24 working hours. (You'll understand later in the post why i highlighted working hours)
  5. Warning  Actions: What should be done when system warns for SLA completion i.e. if SLA didn't succeeded in warning duration defined, what action must follow.


Step 9: Here are the steps you can take as success/failure/warning action:

  1. Send email
  2. Create a record
  3. Update any record related to case or case itself
  4. Assign a record
  5. Change status of a record

  1. Step 10 : Here are the steps i have taken as action on different events:

  1. I have send emails to different people on different actions.
  2. Save the SLA item


Step 11: Now it's time to activate SLA as shown in image below:

  1. Click activate to activate the SLA


Step 12: Once activated, you need to set this SLA as default:


Part B) Below is the Step by Step procedure Create a Customer Service Schedule :

Step 1: Navigate to Setting Setting->Service Management:

Step 2:   Click Customer Service Schedule(3).

Step 3:   Click New to create a new Customer Service Schedule.


Step 4:  Below is the how i have created a new schedule:

  1. Work Hours:
    1. Are the same each day(1): i.e. we need to select work hours and same schedule will be applicable for each day (Will show how to set it in step 4)
    2. Vary by day(2): You can select different work-hours on different days for example on mon. tue, wed It's 9 AM - 6 PM and for thu, fri, sat it's 10 AM - 7 PM
    3. 24*7 Support (3): If business runs 24 hours , 7days
  2. Work Days: Selected days shows a on business and non-selected days show off of business on that day. (System will not ask for work days in 24*7 support)
  3. Holiday Schedule: If ant Holiday schedule us defined you can check observe and select that holiday schedule . SLA calculation take care of holiday schedule only if you have selected observer.  Here we have selected a holiday schedule in which all 12 2nd saturdays are selected so that system takes those days business closure.


Step 4: This is how work hours are selected.


Part C) Below is the  procedure to Create a Holiday Schedule :


Step 1: Navigate to Setting Setting->Service Management:


Step 2:   Click Customer Holiday Schedule(3).


Step 3:   Click New to create a new  Holiday Schedule.


Step 4:  Add new holidays in the holiday schedule as shown in image below:


Part C) Testing Our SLA

Step1: As we have set this SLA to be applicable on cases originated from phone call only.
Here i have created a case from phone call:


Step 2: Lets verify the system calculations:

  1. Case Created on                                :            05 June, 2016, 12:00 PM
  2. SLA Warning Time                            :             1 Day/24 Working Hour
  3. SLA Failure Time                               :             2 Days/48 Working Hour
  4. System Calculate Warning Time      :             8 June 2016, 06:00 PM
  5. System Calculate Failure Time         :            13 June 2016, 06:00 PM
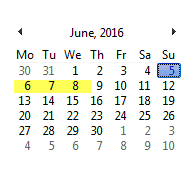
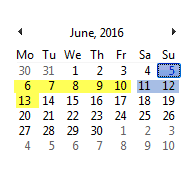
Here yellow in the calendar indicate full working day and blue indicate an off of business.
Total work Hrs of 1 working day : 8 hrs
Warning Time  : 24 Hrs
  • 5 June 2016  : Sunday   : 0 hrs 
  • 6 June 2016  : Monday   : 8 hrs
  • 7 June 2016  : Tuesday   : 8 hrs 
  • 8 June 2016  : Monday   : 8 hrs
At 8 June 2016, 06:00 PM  - 24 Work hrs
So Warning Time should be 8 June 2016, 06:00 PM 

We can use the formula as well. Here is the formula:
Resolve By = (24 hours / working hours * failure tolerance days) + Created On
Warning Time=(24/8*1)+Created on
Warning Time=3 days + Created on
Warning Time=8 June 2016, 06:00 PM


SLA Failure Time  : 24 Hrs
  • 5 June 2016  : Sunday              : Sunday off           -  0 hrs
  • 6 June 2016  : Monday              : 8 hrs
  • 7 June 2016  : Tuesday             : 8 hrs 
  • 8 June 2016  : Wednesday       : 8 hrs
  • 9 June 2016  : Thursday           : 8 hrs
  • 10 June 2016  : Friday              : 8 hrs 
  • 11 June 2016  : Saturday          : 2nd Saturday off - 0 hrs
  • 12 June 2016  : Sunday            : Sunday off           -  0 hrs
  • 13 June 2016  : Sunday            :  8 hrs

At 13 June 2016, 06:00 PM  - 24 Work hrs
So Warning Time should be 8 June 2016, 06:00 PM 

We can use the formula as well. Here is the formula:
Resolve By = (24 hours / working hours * failure tolerance days) + Created On
Warning Time=(24/8*2)+Created on
Warning Time=6 days + Created on
Warning Time=13 June 2016, 06:00 PM (Excluding offs)

So this is how we have calculated the warning and SLA failure date and verified them with dates calculated by system.


How to Disable SLA and set status on which SLA can be pause:


I hope i was able to explain the SLA set up  in MS CRM. In case of any clarification needed, feel free to comment.


Comments are highly appreciated..!!!

Happy CRMing