Friday 10 June 2016

How to find GUID of record in Microsoft Dynamics CRM using bookmark

How to find GUID of record easily using bookmark in Microsoft Dynamics CRM (the cool way)


I this post we'll learn a cool hack to get the GUID of the current record using bookmark.
Conventionally what we do is click on email a link on the CRM page and the link get opened in
outlook and you copy the guid. Seems boring..! isn't it?


Now we have a cool way to get GUID of the record of Microsoft dynamics crm.

Here is what you have to do:

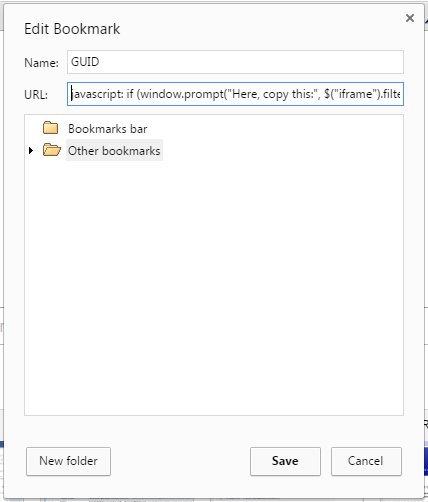
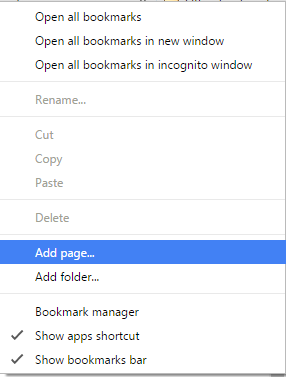
Create a new bookmark in google chrome :


Copy paste the below code as the url of your bookmark:

//////////////////////////////////////////////////////////////////////////////////////////////////////////////////////////////////////////////////////////////////////////////////////////////////////////

javascript: if (window.prompt("Here, copy this:", $("iframe").filter(function () { return ($(this).css('visibility') == 'visible') })[0].contentWindow.Xrm.Page.data.entity.getId().slice(1, -1))) { }

//////////////////////////////////////////////////////////////////////////////////////////////////////////////////////////////////////////////////////////////////////////////////////////////////////////


Now just open the record you want to get GUID in your browser and click on the bookmark you just created


Voila..!! Its done. You'll get the GUID in the box.

Hope it would be helpful.

Comments are highly appreciated..!!!

Happy CRMing 


Monday 6 June 2016

How to send email with attachment in Microsoft Dynamics CRM using c#

How to send email along with attachment in Microsoft Dynamics CRM using c#

How to add attachments to an activity/email inMicrosoft Dynamics CRM using c#


Today we'll learn how we can send emails along with attachments using c# code.

There are situations when we need to generate emails using plugins or sometime we need to build

scheduler services to send emails along with attachments on regular interval.


In such scenario one needs to write code to create email activity in CRM using code and send that email from code itself.


Here is the C# code snippet to do the same:


How to create toParty:
//////////////////////////////////////////////////////////////////////////////////////////////////////////////////////////////////////////////////////////////////////////////////////////////////////////

   Entity toParty = new Entity("activityparty");
   toParty["participationtypemask"] = new OptionSetValue(0);
   toParty["addressused"] = "email address of receiver";
   toParty["fullname"] = "full name of 
receiver";


How to send email along with the attachment:
//////////////////////////////////////////////////////////////////////////////////////////////////////////////////////////////////////////////////////////////////////////////////////////////////////////
 public static void sendEmail(Entity to_Party,String Emailbody,String attachmentbody,IOrganizationService service)
        {
            Entity email = new Entity("email");
            Entity from_Party = new Entity("activityparty");
           
           QueryExpression queue = new QueryExpression("queue");
            queue.Criteria.AddCondition("name", ConditionOperator.Equal, "your sender queue name");
            queue.Criteria.AddCondition("statecode", ConditionOperator.Equal, 0);
            EntityCollection queueColl = service.RetrieveMultiple(queue);
            if (queueColl.Entities.Count > 0)
            {
                from_Party["partyid"] = new EntityReference("queue", queueColl.Entities[0].Id);
            }

            email["from"] = new Entity[] { from_Party };
            email["to"] = new Entity[] { to_Party };
            email["subject"] = "Subject of the Email";
            email["description"] = Emailbody;
            Guid emailguid = service.Create(email);

           //Add text attachment 
            addattachments(emailguid, service, attachmentbody);

            SendEmailRequest sendEmailreq = new SendEmailRequest
            {
                EmailId = emailguid,
                TrackingToken = "",
                IssueSend = true
            };
            SendEmailResponse sendEmailresp = (SendEmailResponse)service.Execute(sendEmailreq);  
        }

 public static void addattachments(Guid emailguid,String message,IOrganizationService service)
{
Entity attachment = new Entity("activitymimeattachment");
attachment["subject"] = "Attachment";
string fileName = "Attachment.txt";
attachment["filename"] = fileName;
byte[] fileStream = Encoding.ASCII.GetBytes(message);   

attachment["body"] = Convert.ToBase64String(fileStream);
attachment["mimetype"] = "text/plain";
attachment["attachmentnumber"] = 1;
attachment["objectid"] = new EntityReference("email", emailguid);
attachment["objecttypecode"] = "email";
service.Create(attachment);
}
////////////////////////////////////////////////////////////////////////////////////////////////////////////////////////////////////////////////////////////////////////////////////////////////

Hope it would be helpful.


Comments are highly appreciated..!!!

Happy CRMing 

Sunday 5 June 2016

How to set up SLA in Microsoft Dynamics CRM (Step by Step)

How to set up SLA in Microsoft Dynamics CRM (Step by Step) :

In this post we'll learn how to set up Enhanced SLA in our Microsoft Dynamics CRM instance.
In the process, we'll learn how do Enhanced SLA works, what are SLA KPIs and how do we set up SLA KPIs, how to set up success and failure criteria of SLA and how to make system to perform some predefined actions on success/failure of SLA. I'm expecting you to know what is SLA and why it is used in MS Dynamics CRM. We'll not discuss Simple SLA and this post will be limited to Enhanced SLA.


Standard vs. enhanced SLAs: What’s the difference?

Microsoft Dynamics CRM lets you create two types of SLAs: Standard and Enhanced. Standard SLAs can only be created for the Case entity. We recommend that you use enhanced SLAs, which have some additional capabilities that standard SLAs don’t have. With an enhanced SLA, you can:
  • Create SLAs for entities other than Case.
  • Pause an SLA when the case is on hold, so that when case is on hold,that duration  isn’t considered in SLA calculations.
  • Add success actions to an SLA. For example, you may want to send communications internally or outside your organization when the SLA has succeeded. Success actions are initiated only when the success condition is met on time, not when it is breached.
  • Track SLA statuses and times right on the case form by default. These details are tracked through the SLA KPI Instance record type.

Entities (record types) that support SLA
In previous releases, you could create SLAs only for case records. With CRM Online 2016 Update 1 and CRM 2016 SP1, you can now create enhanced SLAs for entities that are enabled for SLA. A system administrator or customizer can enable SLAs for the following entities:
  • Account
  • Contact
  • Order
  • Invoice
  • Quote
  • Opportunity
  • Lead
  • All activity entities like email, phone, and appointment except recurring appointment and its instances


Note
SLA can also be enabled for custom entities and custom activities.

A bit about Enhanced SLA:

Enhanced SLAs were introduced with the CRM 2015 release and removed some of the manual processes of the standard and introduced a number of new enhanced features.


SLA Pause Resume:
    • SLA Time calculation is automatically paused when a case is put on Hold.
    • The amount of time on hold is also tracked
    • The ability to pause can be disabled/enabled for each SLA


Part A) Below is the Step by Step procedure to set up SLA :

Step 1: Navigate to Setting->Service Management:


Step 2: Click Service Level Agreement (1) in Service Terms section


Step 3: All service level agreements view will open. Click new to create a new SLA.


Step 4: Create a new SLA record with proper details as shown in image below.


  • Applicable From: Created on
  • In Business hour : Select a Customer service scheduled (Here i have already created one, will explain how to create one in part B of this post)
  • SLA Type : Enhanced
  • Allow Pause and Resume : Allow
  • Save the SLA record


Step 5: In SLA details section below, add an SLA item by clicking on + sign as show in image below:


Step 6:  A new SLA item window will open. Fill the details as follows:

  1. Fill the name.
  2. Select the type of KPI (Response by/Resolve by)
  3. In applicable when we set the criteria when this SLA should be enabled on any case.
  4. In success criteria, we'll define when the SLA will be succeeded.


Step 7: Here i have selected parameters as below:

  1. Applicable when : Case origin is phone call i.e. this SLA should be applicable on the cases created from phone call.
  2. Success Criteria: Case status is Resolved or canceled i.e. SLA will succeeded when Case will be resolved or canceled.


Step 8: Item displayed below means follows:

  1. Success Action: What should be done when SLA succeeded
  2. SLA Item Failure:After how much time of case creation SLA should fail if it is not succeeded. Here we have selected 2 days i.e. 48 working hours. (You'll understand later in the post why i highlighted working hours)
  3. Failure Actions: What should be done when SLA fails i.e. if SLA didn't succeeded in duration defined, what action must follow.
  4. SLA Item Item Warning :After how much time of case creation system should warn if it is not succeeded. Here we have selected 1 day i.e. 24 working hours. (You'll understand later in the post why i highlighted working hours)
  5. Warning  Actions: What should be done when system warns for SLA completion i.e. if SLA didn't succeeded in warning duration defined, what action must follow.


Step 9: Here are the steps you can take as success/failure/warning action:

  1. Send email
  2. Create a record
  3. Update any record related to case or case itself
  4. Assign a record
  5. Change status of a record

  1. Step 10 : Here are the steps i have taken as action on different events:

  1. I have send emails to different people on different actions.
  2. Save the SLA item


Step 11: Now it's time to activate SLA as shown in image below:

  1. Click activate to activate the SLA


Step 12: Once activated, you need to set this SLA as default:


Part B) Below is the Step by Step procedure Create a Customer Service Schedule :

Step 1: Navigate to Setting Setting->Service Management:

Step 2:   Click Customer Service Schedule(3).

Step 3:   Click New to create a new Customer Service Schedule.


Step 4:  Below is the how i have created a new schedule:

  1. Work Hours:
    1. Are the same each day(1): i.e. we need to select work hours and same schedule will be applicable for each day (Will show how to set it in step 4)
    2. Vary by day(2): You can select different work-hours on different days for example on mon. tue, wed It's 9 AM - 6 PM and for thu, fri, sat it's 10 AM - 7 PM
    3. 24*7 Support (3): If business runs 24 hours , 7days
  2. Work Days: Selected days shows a on business and non-selected days show off of business on that day. (System will not ask for work days in 24*7 support)
  3. Holiday Schedule: If ant Holiday schedule us defined you can check observe and select that holiday schedule . SLA calculation take care of holiday schedule only if you have selected observer.  Here we have selected a holiday schedule in which all 12 2nd saturdays are selected so that system takes those days business closure.


Step 4: This is how work hours are selected.


Part C) Below is the  procedure to Create a Holiday Schedule :


Step 1: Navigate to Setting Setting->Service Management:


Step 2:   Click Customer Holiday Schedule(3).


Step 3:   Click New to create a new  Holiday Schedule.


Step 4:  Add new holidays in the holiday schedule as shown in image below:


Part C) Testing Our SLA

Step1: As we have set this SLA to be applicable on cases originated from phone call only.
Here i have created a case from phone call:


Step 2: Lets verify the system calculations:

  1. Case Created on                                :            05 June, 2016, 12:00 PM
  2. SLA Warning Time                            :             1 Day/24 Working Hour
  3. SLA Failure Time                               :             2 Days/48 Working Hour
  4. System Calculate Warning Time      :             8 June 2016, 06:00 PM
  5. System Calculate Failure Time         :            13 June 2016, 06:00 PM
Here yellow in the calendar indicate full working day and blue indicate an off of business.
Total work Hrs of 1 working day : 8 hrs
Warning Time  : 24 Hrs
  • 5 June 2016  : Sunday   : 0 hrs 
  • 6 June 2016  : Monday   : 8 hrs
  • 7 June 2016  : Tuesday   : 8 hrs 
  • 8 June 2016  : Monday   : 8 hrs
At 8 June 2016, 06:00 PM  - 24 Work hrs
So Warning Time should be 8 June 2016, 06:00 PM 

We can use the formula as well. Here is the formula:
Resolve By = (24 hours / working hours * failure tolerance days) + Created On
Warning Time=(24/8*1)+Created on
Warning Time=3 days + Created on
Warning Time=8 June 2016, 06:00 PM


SLA Failure Time  : 24 Hrs
  • 5 June 2016  : Sunday              : Sunday off           -  0 hrs
  • 6 June 2016  : Monday              : 8 hrs
  • 7 June 2016  : Tuesday             : 8 hrs 
  • 8 June 2016  : Wednesday       : 8 hrs
  • 9 June 2016  : Thursday           : 8 hrs
  • 10 June 2016  : Friday              : 8 hrs 
  • 11 June 2016  : Saturday          : 2nd Saturday off - 0 hrs
  • 12 June 2016  : Sunday            : Sunday off           -  0 hrs
  • 13 June 2016  : Sunday            :  8 hrs

At 13 June 2016, 06:00 PM  - 24 Work hrs
So Warning Time should be 8 June 2016, 06:00 PM 

We can use the formula as well. Here is the formula:
Resolve By = (24 hours / working hours * failure tolerance days) + Created On
Warning Time=(24/8*2)+Created on
Warning Time=6 days + Created on
Warning Time=13 June 2016, 06:00 PM (Excluding offs)

So this is how we have calculated the warning and SLA failure date and verified them with dates calculated by system.


How to Disable SLA and set status on which SLA can be pause:


I hope i was able to explain the SLA set up  in MS CRM. In case of any clarification needed, feel free to comment.


Comments are highly appreciated..!!!

Happy CRMing 

Friday 3 June 2016

How to Qualify Lead without creating Opportunity/Account/Contact in Microsoft Dynamics CRM using C#

How to Qualify Lead without creating Opportunity/Account/Contact in Microsoft Dynamics CRM using C#


How to prevent MS CRM from creating Opportunity/Account/Contact while qualifying a Lead


A lot of sales teams are frustrated with how lead conversion works in Microsoft Dynamics CRM.  Starting with CRM 2013, whenever a user clicks the “Qualify” button, an Opportunity is always created.  We were hoping to see a fix in CRM 2016 but, sadly, the process still works the same.

How can an organisation reconfigure Microsoft Dynamics CRM to allow sales to qualify a lead without creating an opportunity?

The qualify process built into Microsoft Dynamics CRM assumes that the lead conversion process always ends either in disqualification, or in the creation of an opportunity.  But most businesses have lead conversion scenarios that don’t end in the creation of an opportunity.  Consider the following:

  • A new contact from an existing account visits the website and completes a contact us form (perhaps requesting a downloadable resource, without any intent to purchase anything at this time).  Sales wants this lead to be visible on the account, so they would like to convert the lead and create a contact, but without creating an opportunity.
  • Inside Sales qualifies incoming leads, and then passes them along to Field Sales for ongoing contact.  Oftentimes a lead is qualified, but is not yet in the market to make a purchase.  Field Sales still wants to be able to work this prospect, but they don’t work with leads  (only accounts and contacts). They need to convert a lead into an account and contact, but without creating an opportunity.
There are many more scenarios like the two above. 
How can the sales department fix CRM to work the way that they do, instead of being forced to work the way CRM does?
Sometimes what developers does is that they create a custom button on Lead entity ribbon and Write a plugin code using  QualifyLeadRequest Class where they set what to create and what not (among Account/Contact/Opportunity).
Although it serves the purpose,but we have a better solution where we need not to Qualify Lead using different code by calling a plugin from custom button, instead we tell system what to create and what not.

What we need to do is to register a plugin on QualifyLead message on pre-event on lead and set CreateOpportunity/CreateAccount/CreateContact false.


Here what we got is, we need not to hide system Qualify button and neither we need to create other custom button to qualify lead.


Below is the code snippet where i have prevented Lead from creating Opportunity and Account:

//////////////////////////////////////////////////////////////////////////////////////////////////////////////////////////
 public void Execute(IServiceProvider serviceProvider)
        {
            IPluginExecutionContext contextPlugin = (IPluginExecutionContext)serviceProvider.GetService(typeof(IPluginExecutionContext));
            IOrganizationServiceFactory factory = (IOrganizationServiceFactory)serviceProvider.GetService(typeof(IOrganizationServiceFactory));
            IOrganizationService service = factory.CreateOrganizationService(contextPlugin.UserId);
            if (contextPlugin.MessageName != "QualifyLead") return;

            OptionSetValue LeadStatecode = new OptionSetValue();
            OptionSetValue LeadStatuscode = new OptionSetValue();
            EntityReference LeadRef = null;
            try
            {
                LeadRef = (EntityReference)contextPlugin.InputParameters["LeadId"];
                Entity Lead = service.Retrieve("lead", LeadRef.Id, new ColumnSet(true));
                if (LeadRef.LogicalName != "lead") { return; }
                LeadStatecode = Lead.GetAttributeValue<OptionSetValue>("statecode");
                LeadStatuscode = Lead.GetAttributeValue<OptionSetValue>("statuscode");
                if (LeadStatecode.Value == 0 && LeadStatuscode.Value == 1)
                {
                    contextPlugin.InputParameters["CreateOpportunity"] = false; // set to true by default 
                    contextPlugin.InputParameters["CreateAccount"] = false;   // set to true by default 
                }
            }
            catch (InvalidPluginExecutionException ex)
            {throw new InvalidPluginExecutionException(ex.Message);}
            catch (Exception ex)
            {throw new InvalidPluginExecutionException(ex.Message);}
            }

//////////////////////////////////////////////////////////////////////////////////////////////////////////////////////////
If we prevent Account/Contact creation this solution works great,but It have a little issue when we prevent it from creating Opportunity.
In this case there is no opportunity Created to which Lead page can redirect to it keps displaying Lead page.
Now if user clicks Qualify again, system throw error that you can't qualify a already qualified Lead.

But, we have a solution for this as well.
What we can do is write a JavaScript code on Form OnSave event which refresh the form:
//////////////////////////////////////////////////////////////////////////////////////////////////////////////////////////
var entityname = Xrm.Page.data.entity.getEntityName();
var entityid =Xrm.Page.data.entity.getId();
Xrm.Utility.openEntityForm(entityname,entityid);function refresh(Context) {
    var SaveMode, SaveEventVal;

    // Change the Save Event Value as per required Save Event
    SaveEventVal = 16;

    if (Context != null && Context.getEventArgs() != null) {
        SaveMode = Context.getEventArgs().getSaveMode();

        // 16 will pass on Lead Qualify button click
        if (SaveMode == SaveEventVal) {
            setTimeout(function () {
var entityname = Xrm.Page.data.entity.getEntityName();
var entityid =Xrm.Page.data.entity.getId();
Xrm.Utility.openEntityForm(entityname,entityid);

            }, 1);
        }
    }
}
//////////////////////////////////////////////////////////////////////////////////////////////////////////////////////////
Hope it would be helpful.

Comments are highly appreciated..!!!

Happy CRMing